显示标签为“Cheap Acrylic Beads Supplies”的博文。显示所有博文

2013年12月10日星期二

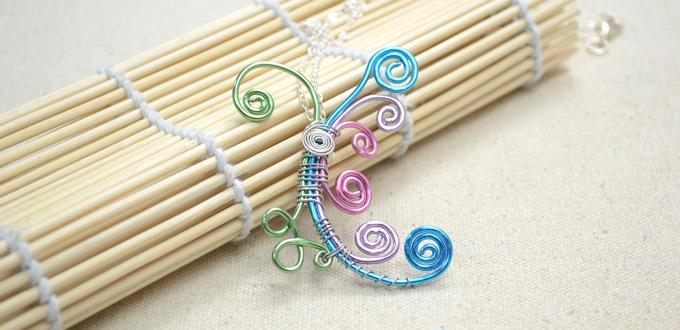
Tutorial on Wire Wrapping Wave Pendant with Basic Techniques

Summary: This wire wrapped pendant tutorial is to let you know some elementary techniques about wire wrapping a wave pendant with colorful aluminum wires.
8seasons
  • 8seasons
  • 8seasons
  • 8seasons
  • 8seasons
  • 8seasons
Ocean owns a lot of precious resource it 's so profound that many mysteries remain awaiting our exploration. It 's been bearing the desires teenagers for many generations. Therefore in my eyes, ocean is usually colorful and vigorous. Today I present the wire wrapped pendant tutorial and show you a flamboyant &ldquoocean wave&rdquo.

Necessities for the wire wrapped wave pendant:

1.5mm pink aluminum wire
1.5mm blue aluminum wire
1.5mm purple aluminum wire
1.5mm green aluminum wire
.5mm silvery brass wire
Silvery brass cross chain
Flat nose plier
Round nose plier
Wire cutter

8seasons

Steps on wire wrapping the wave pendant necklace:

Step One: Wire wrap colorful waves

1st, cut a 15cm amount of pink wire
2nd, produce a loop with round nose and then do two and half coils with flat nose
3rd, leave 2.5cm interval and bend the remainder wire downward
4th. Do one and half coils and stop excess wire
5th, cut a 20cm amount of purple wire and do one and half coils at one end
6th, contrast the purple wire with pink wave, leave appropriate interval and bend one other end
7th, do two and half coils in the opposite end and stop excess purple wire
8th, similarly handle the blue wire and finish the correct blue wave.

8seasons

9th, cut a 20 cm amount of green wire and do two coils at one end
10th, bend on the wire and loop twice with round nose
11th, coil one other end.

8seasons

Step # 2: coil the waves together

1st, cut a lengthy piece of silvery brass wire
2nd, do sparse coils many times onto blue wave and add purple wave
3rd, coil blue and purple waves together
4th, add green wave and get started together
5th, when coils reach the midst of waves, add pink wave and mix the four together
6th, leave 6cm tail and stop excess brass wire
7th, do coils using the tail and the pendant is conducted.

8seasons

Step # 3: Finish the wave pendant necklace

1st, use a jump ring for connecting brass chain with pendant
2nd, attach lobster claw to chain end.

8seasons
The wire wrapped wave pendant necklace is like:

8seasons
Tada! I 've done the wire wrapped wave pendant necklace. Most incredible wire pendants are often consists of different wrapped and coiled patterns. In the same manner, you can even make flowery or animal-like pendants.

2013年12月3日星期二

Easy Instructions on Making a Rainbow Beaded Flower Hair Clip

Summary: Wondering learning to make a beaded bobby pin? Here 's a very easy instruction on building a rainbow beaded flower hair clip.
8saesons
  • 8seasons
  • 8seasons
  • 8seasons
  • 8seasons
Try on some the colours of rainbow in hair should you follow this instruction regarding how to make a beaded flower hair clip! A good looking rainbow beaded flower hair clip can be and quickly created out of numerous acrylic beads, a clear resin button, a thin brass wire plus a bobby pin.

Materials and tools for making a rainbow beaded flower hair clip:

6mm Colorful Acrylic Beads, Round, Mixed Color
11mm Resin Button, Bright Circled, Mixed Color
.3mm Brass Wire, Chocolate
Bobby Pin
Wire Cutters (Not Shown)
Hot Glue Gun

8seasons

How to make a rainbow beaded flower hair clip?

Step 1: make a beaded flower

1st, string sixty acrylic beads in a variety of colors on the long brass wire
2nd, divide the beads into five quintiles that many petal includes twelve beads. Twist the wiresnext to the latter beads of every petal to shape a flower.

8seasons

Step 2: attach button and bobby pin

1st, pass the tail of wire over the holes of a button and wrap the ends around the wires in the center from the flower. Cut excess wire off
2nd, glue a bobby pin with the backside from the beaded flower.

8seasons
Here 's the final look:

8seasons
The brass wire is quite flexible and malleable. When twisting the wires to help make the beaded flower, there is no need to worry about failure. You can attempt again very quickly. It 's going to be great to create this cute beaded flower hair clip to your young daughter.

2013年12月2日星期一

Steps to make A Bracelet Which Has Infinite Energy

Hey! My dear friends! Long time no see! Today I 'll teach you making a bracelet is not only vintage style but in addition fashionable. The procedures are very simple and all the materials you should prepare is easy to find on 8seasons.com. It takes merely 5 minutes to generate this bracelet. This bracelet is easy matching and may fulfill your a sense achievement! Now, let go!

All of the materials you 'll need:
1. A set of scissors
2. A set of pliers
3. One roll of Fuchsia Velvet Cord for Necklace (8Seasons provide more other colors for the choices)
4. Two Silver Tone Cord Crimp End Caps
5. One Infinity Symbol Antique Silver Connector Finding
6. One Silver Tone Lobster Clasps
7. One Silver Tone Extended Jewelry Chain 8. Two Silver Tone Open Jump Rings1

Now, let begin!

2

Step1: Cut about 18 cm from the velvet cord (clearly one can cut it depend all on your own wrist length. Fold one and thread it to at least one end from the connector.

3

Step # 2: Pull both ends of velvet cord back

4

3: Then there is a knot for the connector because picture shows. Meanwhile, you 're able to do the same conversely from the connector.

5

Step # 4: Take out the other velvet cord and fold it. Put the two ends in to the clamping piece. Accomplish the same to another two ends cord for the connector.

6

Step # 5: Clamp the clamping piece with the pliers to make sure the velvet will not likely walk out the clamp piece. Do the same conversely.

7

Step Six: Clamp the open jump rings and also the lobster clasps for the two ends from the clamping piece

8

It 's been done! Is always that easy for you?

9

You can even select the colors that suits you probably the most to fit your wardrobe. We 've different colors of velvet cord that you should choose. Have you got a sense achievement? Just share the happiness with your friends now!

Whereby traders emit the look of a stone bead or a metal bead

Wholesale Acrylic Beads8seasonsare essentially just plastic beads and so are sometimes known as Lucite beads. These beads are becoming more and more popular today. What8seasonsmore, one can choose from various sizes and shapes with a number of the common shapes being faceted, flower, round, flat, leaf and many other shapes. Precisely why these are becoming more popular is they look elegant, light, and cost-effective are available in numerous jewelry and craft stores.8seasons"B27422A_500_5008seasons"

Since the8seasonsWholesale Acrylic Beads8seasonsare in various colors and shapes, the jewelry makers can decide what they have to like such as colorful ones, antique ones, transparent ones, painted ones etc. Some acrylic beads resemble gemstone beads while some give the look of crystal beads. Whereby traders emit the look of a stone bead or a metal bead.

Regardless of how the beads are look like, the regular characteristic is they all have a lovely price. Select doubt that a wise substitute for choose the acrylic beads to produce necklaces or another jewelry since the beads can establish attention grabbing elegance. Since there are many acrylic beads around, one need not bother about what number of beads they use.

The Wholesale Acrylic Beads have variety kinds of uses. They can be used many times to brighten houses. This really is all since these beads create that colorful to research the house making your home appear lively. These beads can also be used to brighten the inside of cars to ensure they are look amazing. This may include using it about the carseat to get the seat a unique look. Lastly they may be used on clothing for example on shoes, bags, hats and also other wearable accessory.8seasons"B27254C_500_5008seasons"

The good thing about these beads is that you may utilize them to produce stylish handmade jewelry all by yourself and thus you develop your personal unique designs. You8seasons'll be able to provide the jewelry made to people close to you and they8seasons're going to surely appreciate them. You can even use Wholesale Acrylic Beads to produce jewelry available for sale especially if you can to produce appealing jewelry. This sort of idea is greatly considering that most of the jewelry created from these beads might be worn with any clothing and this implies you8seasons'll be able to offer to almost any one.

Dorabeads.com is probably the world8seasonslargest wholesale beads and jewellery supplies providers. Dorabeads.com is really a professional distributor of Wholesale Acrylic Beads for jewelry, it could provide a huge number of Wholesale Acrylic Beads for jewelry in factory prices. At Dorabeads.com you8seasons'll enjoy your shopping experience and discover those items you need.

2013年12月1日星期日

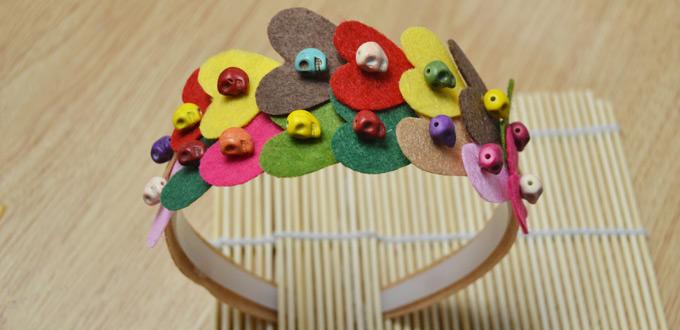
Tutorials on Setting up a Colorful Heart Headband for Girls

Summary: Listed here is a colorful heart headband for area. It is constructed of felt and beads in various colors, your daughter will like it. Continue reading to learn to do!
8seasons
  • 8seasons
  • 8seasons
This tutorial regarding how to make a colorful heart headband is simple, even your daughter can help it become on hand. You simply need to cut some heart shapes and glue them about the headband with beads. These are beads, there is a thing that I would like to draw your attention to, utilize skull beads in case your daughter feels Comfortable with them, or change them! My purpose of using skull beads is perfect for personality, and also the beads I chose aren 't that scary. However, ask your daughter over it!

Materials and tools to create a colorful heart headband for area:

10mm Synthetic Turquoise Beads, Skull, Mixed Color
Felt, Mixed Color
Plastic Headband
Scissors
Hot Glue Gun

8seasons

Making a colorful heart headband for area?

The First Step: remove heart shapes

1st, remove several heart shapes from felt in several colors, i cut sixteen pieces
2nd, cut an extensive strip from beige felt with similar length because headband and glue it to pay the top of headband.

8seasons

Step Two: glue heart shapes and beads

1st, glue two rows of heart shapes about the headband optionally. Ensure each heart shape covers the bottom of the last one
2nd, glue a turquoise bead on each heart shape in position.

8seasons
This is actually the final look:

8seasons
Lovely heart shapes and rainbow colors are very ideal for area. Have fun causeing this to be colorful heart headband with your sweet daughter!
8seasons provide wholesale turquoise beads supplies at factory price. With variety of turquoise beads stock sale for jewelry makers, jewelry retailers and wholesalers, we promise to ship worldwide within two days.

2013年11月25日星期一

Setting up a Mini Three-Dimensional Christmas tree With Sand and Brass Wire

Summary: this can be a three-dimensional christmas tree minature, quite adorable and suitable to get christamas gift. This tutorial shows information about thus, making this wire wrapped christams tree!

8seasons
  • 8seasons
  • 8seasons
  • 8seasons
  • 8seasons

There are numerous two-dimensional christmas tree tutorials on webs, what if you want to produce a three-dimensional mini christmas tree as gift for some individuals? This I will satisfy this demand: showing information about forcing a sweet christmas tree with brass wire and sand.

Necessites because of this three-dimensional wire christmas tree:

.5mm light orange brass wire
4mm green glass seed beads
4mm ivory glass pearl beads
Flat nose plier
Wire cutter

Necessites for this three-dimensional wire christmas tree

The instructions on making three dimensional Christmas tree:

Step 1: Result in the tree rsquos top layer

1st, select a 50cm period of brass wire and string 4 green beads and 1 ivory pearl on
2nd, back the wire over the green beads and tighten it
3rd, secure beads by twining the wire ends around the other person
4th, string 3 green beads and 1 pearl on wire end and repeat above process
5th, when finishing five 3-green-bead branches, twine the wire ends together
6th, the 4-green-bead branch may be the Christmas tree rsquos top, and also the whole may be the top layer.

Step 1: Make the tree rsquos top layer

Step Two: Result in the tree rsquos middle layer

1st, select a 55cm period of brass wire and string 4 green beads and 1 pearl on
2nd, refer to step 1 to make other branches, but be noticed that all branch with this layer contains one pearl and 4-6 green beads
3rd, finishing 7-8 branches, twine the wire ends together
4th, make 3 such middle layers.

Step 2: Make the tree rsquos middle layers

Step # 3: Result in the bottom layer

1st, pick another 55cm period of brass wire and string 10 green beads and 1 pearl
2nd, still repeat step 1 processes, and also the green beads range from 6-10
3rd, finally twine the wire ends together to finish the very first bottom layer
4th, repeat to make another two.

Step 3: Make the bottom layers

Step 4: Assemble the layers together

1st, connect middle layers to top layer which has a 1.5cm interval involving
2nd, similarly connect bottom layers to top and middle layers
3rd, twine all of the wire ends together.

Step 4: Assemble the layers together

Step . 5: Finish the tree rsquos stem

1st, leave 3cm length for tree rsquos stem, bend the others wire up
2nd, twine the wires around the other person.

Step 5: Finish the tree rsquos stem

The final three-dimensional wire Christmas tree is like this:

8seasons

Tada! I 've finished this mini Christmas tree! This three dimensional wire wrapped Christmas tree appears to have more steps than other projects, but each step is very easy to be aware of, mainly the first three steps almost repeat the same process. You can make it!